Making your Windows 11 look like Windows 10 requires a combination of tweaking your registry settings and using a third-party tool. Fortunately, you can choose if you want all or only a few components to look like Windows 10.
For example, you might be annoyed that the Start Menu looks bigger but displays fewer items. Maybe you don’t like having to click “Show more options” to get the full context menu.
The good news is that you can change all this to what you remember from Windows 10. The bad news? Microsoft might disable a few registry hacks discussed in this guide with future Windows updates because it really wants you to use the newly designed interface.
Before You Start
Before you use any of the methods discussed in this guide, you should know the following:
- Some methods involve tweaking the registry.
While it’s safe to change registry settings mentioned in this guide, deleting an important registry key or modifying it could lead to major problems. You should back up your registry before starting.
- StartAllBack is a paid tool.
We’ve used StartAllBack as the third-party tool in methods that require one. The tool offers a 100-day trial but isn’t completely free. If you’re looking for a free tool, use Open-Shell from GitHub.
- Create a restore point.
There’s room for error whenever you’re changing too many things in Windows. You always want the option to undo the changes should you mess something up, so create a restore point before you perform any of the tweaks in this guide.
How to Make Windows 11 Start Menu Look Like Windows 10
The Start Menu is perhaps the most dreaded change in Windows 11. For decades, we had been moving the cursor to the bottom left and left-clicking to open the Start Menu — I could do it in my sleep.
Suddenly, Windows wants us to position the cursor somewhere closer to the center, based on how many pinned taskbar icons you have. Worse yet, you see plenty of wasted space on the Windows 11 Start Menu.
There are a few easy ways to fix the problem, though.
Position Start Menu to the Left Using the Built-In Tweak
Windows offers just one built-in tweak to make the Windows 11 Start Menu look like Windows 10 (though it does offer other Start Menu customization options). So if your primary Windows 11 pain point is the Start Menu, you might want to use a third-party tool.
If you’re not comfortable installing a third-party app, you can still left-align Start Menu like in Windows 10:
- Right-click on the taskbar and select Taskbar settings.
- Expand the section called Taskbar behaviors.
- Expand the drop-down menu next to Taskbar alignment and select Center.

This will put the Start Menu icon in the bottom-left corner of your screen.
Redesign Start Menu With a Third-Party Tool
If you want to redesign your Start Menu even more, use a third-party tool like StartAllBack. Downloading StartAllBack and launching the .exe will automatically apply a new theme to your computer. Once you see the changes applied:
- Right-click on the taskbar and select Properties.

- Select Kinda 10 from the Welcome tab as the theme.
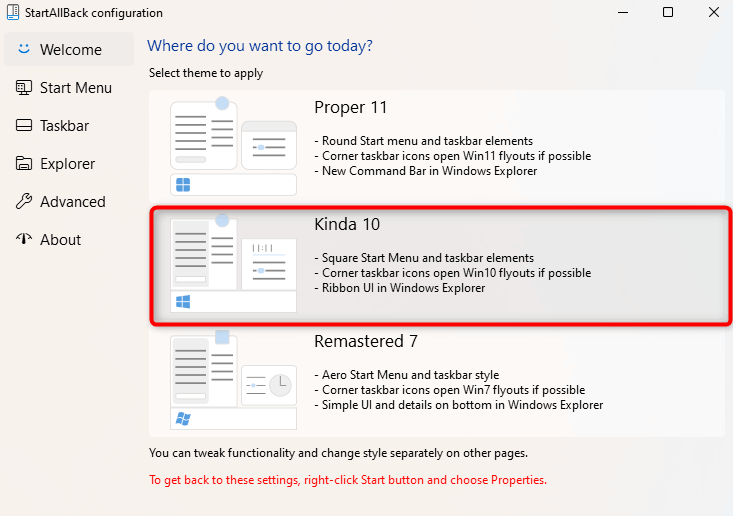
You can also change other Start Menu settings by navigating to the Start Menu tab from the left. However, those settings are more about improving utility than making the Start Menu look like Windows 10’s Start Menu.
You still won’t see the tiles, and the design looks more like the Windows 7 Start Menu than Windows 10, except for the Windows 10 logo as the Start button.
However, changing the Start Menu might still make sense, given it doesn’t waste a ton of screen estate like the new Start Menu in Windows 11. So when you apply the settings, this is what your Start Menu will look like:

How to Make Windows 11 Taskbar Look Like Windows 10
Windows 11 has a few built-in taskbar tweaks, but you can’t make the taskbar look like Windows 10 using just those tweaks. You’ll need to use StartAllBack and make registry tweaks to restyle the new taskbar to look like Windows 10 taskbar.
Redesign Taskbar With a Third-Party Tool
If you like your taskbar at the top of your screen, Windows 11 won’t allow that. Unlike Windows 10, you can’t position your taskbar anywhere but at the bottom. StartAllBack’s taskbar settings can help you reposition and restyle the taskbar (or you can use TaskbarX for more taskbar modification options):
- Right-click on the taskbar and select Properties.
- Select Taskbar from the left.
- Select Taskbar location on screen as Top (or any other option you prefer).
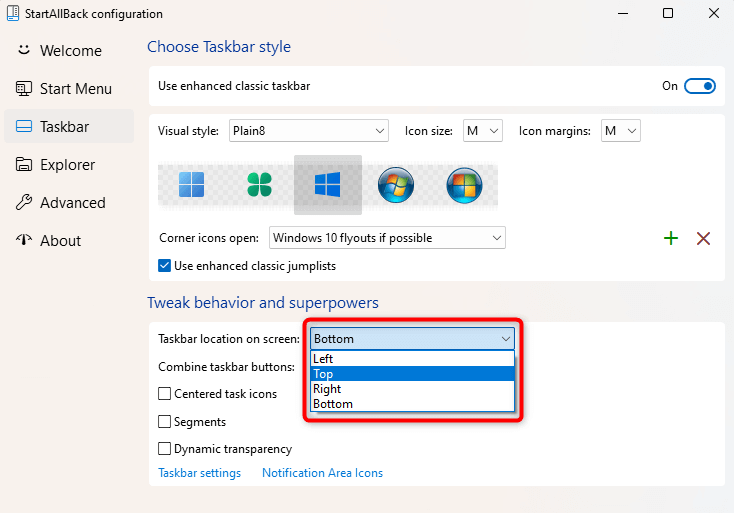
Now, you’ll see the taskbar automatically move to the top of the screen:
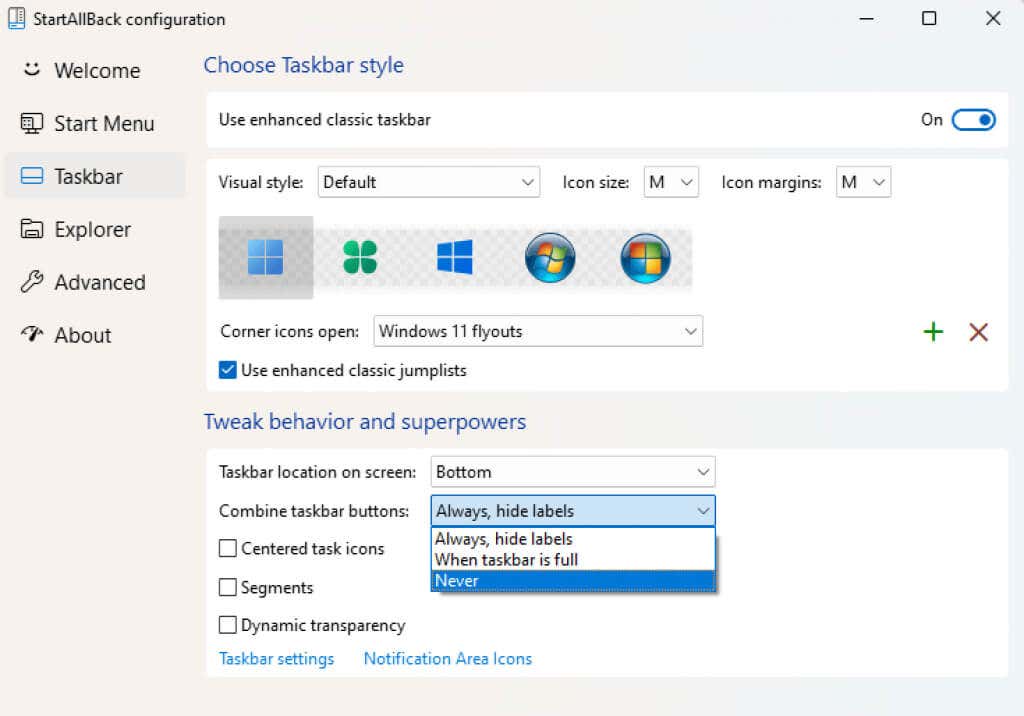
Another thing you might consider changing is taskbar button grouping. Windows 10 lets you choose not to group taskbar buttons, but Windows 11 offers no such option. StartAllBack can help you fix this:
- Switch to the Taskbar tab on StartAllBack.
- Expand the drop-down menu next to Combine taskbar buttons and select Never.
Bring Back the Classic Taskbar With a Registry Tweak
You can switch to the Windows Classic taskbar using a registry tweak. While it makes the taskbar look a lot more like Windows 10 (partly because it also adds the search box), many of the elements in the taskbar don’t function.
For example, clicking on the search box won’t do anything, and clicking on the Task View might crash your PC. More importantly, the Start Menu won’t open unless you use a third-party tool like StartAllBack.
If you still want to Classic taskbar for its look and feel:
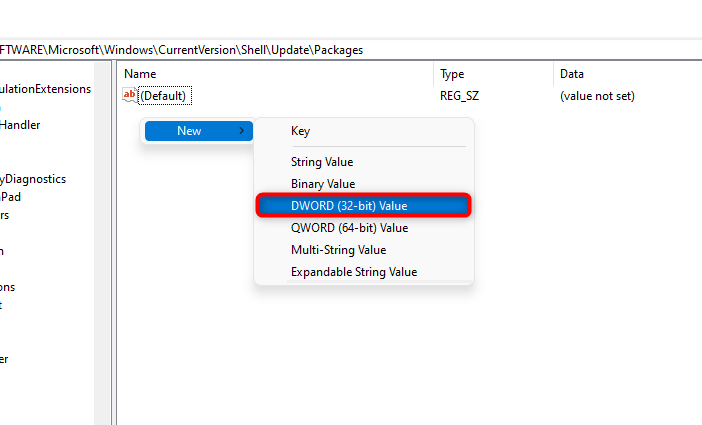
- Press Win + R, type regedit, and press Enter to launch the Registry Editor.
- Copy and paste the following in the Registry Editor’s navigation bar and press Enter:
HKEY_LOCAL_MACHINE\SOFTWARE\Microsoft\Windows\CurrentVersion\Shell\Update\Packages
- Right-click on the blank space in the right pane and select New > DWORD (32-bit) Value.
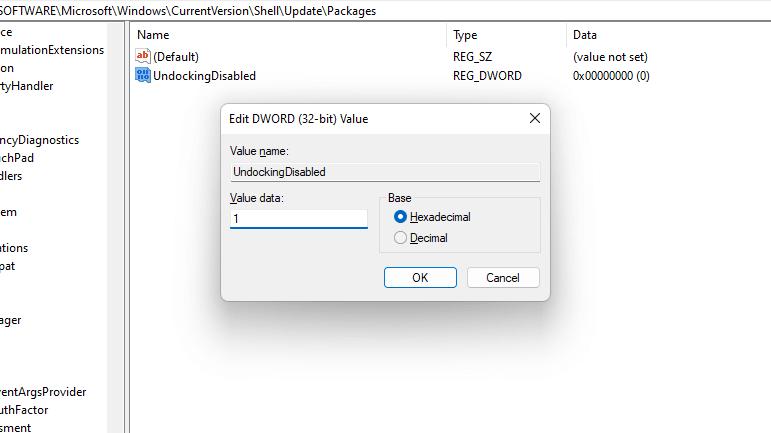
- Double-click on the value, rename it to UndockingDisabled, and set the value as 1.
- Restart Windows.
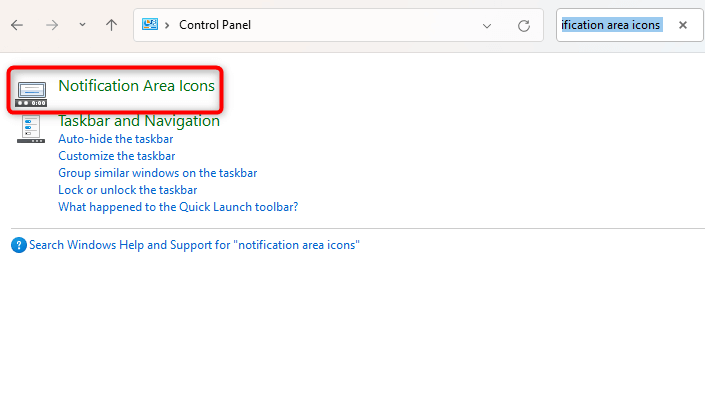
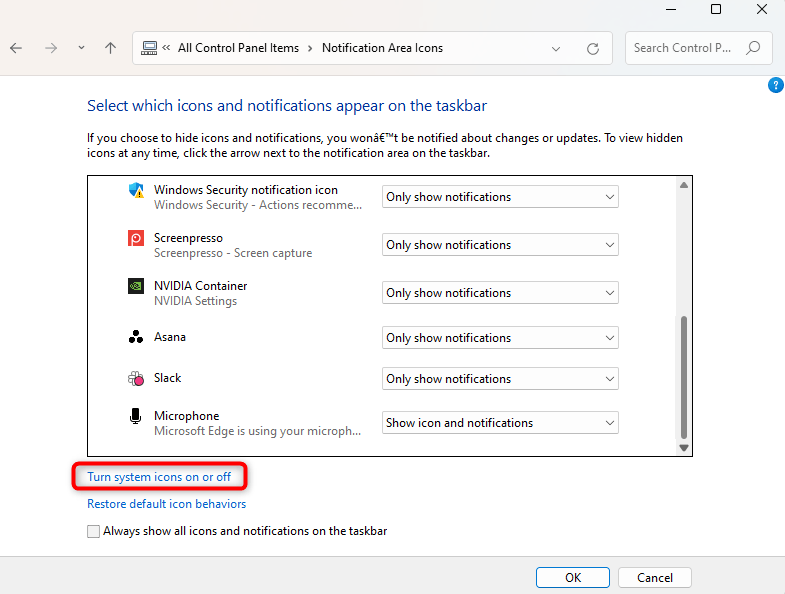
- When you restart, you won’t see the volume control and network icons at the right end of the taskbar. Launch the Control Panel and search for Notification Area Icons to bring them back.
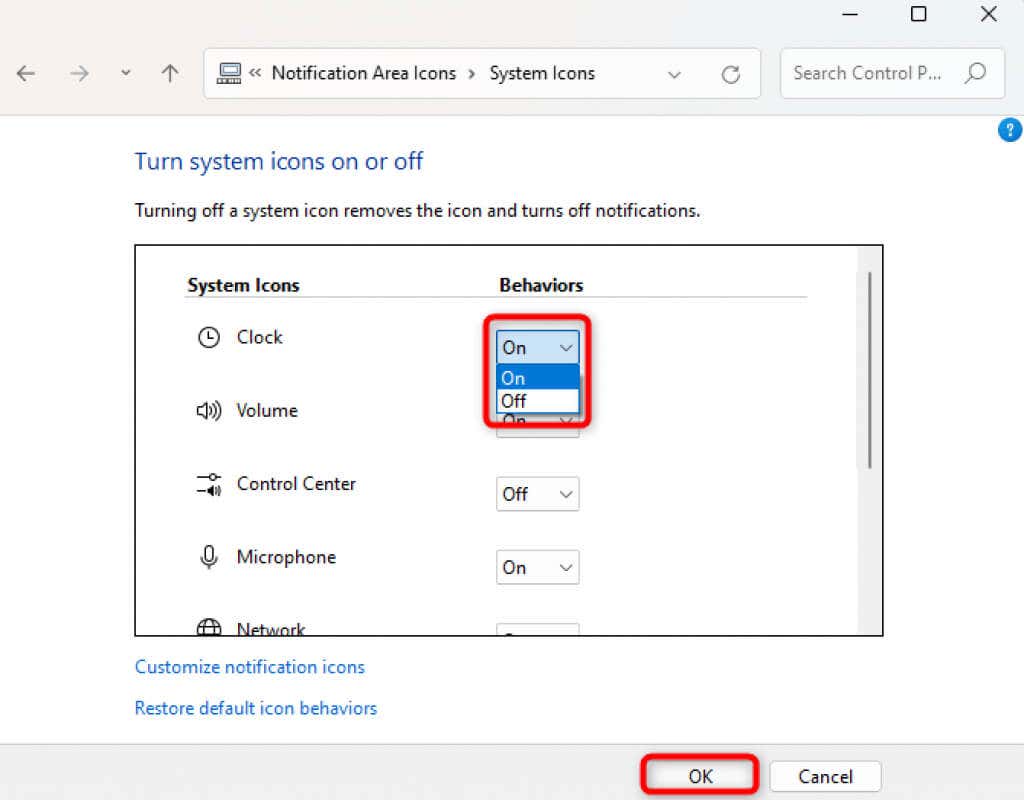
- Select Turn system icons on or off.
- Turn on the system icons per your preference, select OK, and exit the Control Panel.
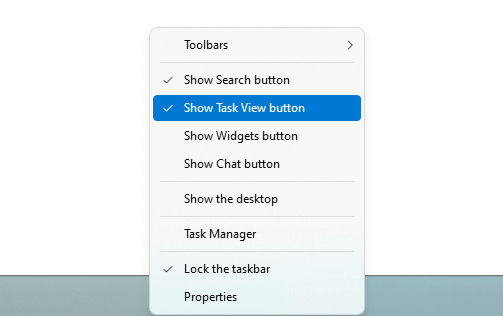
You’ll see the classic taskbar and Start Menu. But you might want to disable the Task View button. Right-click on the taskbar and select the Show task view button. Doing this should disable the Task View.
How to Make Windows 11 Context Menu Look Like Windows 10
Context menus are shorter on Windows 11. Many users don’t appreciate the idea of an extra click to view all options in the context menu. It’s a good thing you can bring back the longer context menu you used on Windows 10 easily using a third-party tool like StartAllBack or tweaking the registry.
Bring Back Older Context Menus With a Third-Party Tool
Select the Explorer tab from the left on StartAllBack. Then, check the box next to Classic context menus in the right pane. That’s all you need to do to get back to Windows 10 style, longer context menus.

Once you’ve selected the checkbox, you’ll see the extended context menus.

Bring Back Older Context Menus With a Registry Tweak
To get longer context menus, tweak the registry:
- Press Win + R, type regedit, and press Enter to launch the Registry Editor.
- Copy and paste the following into the Registry Editor’s navigation bar and press Enter:
HKEY_CURRENT_USER\Software\Classes\CLSID
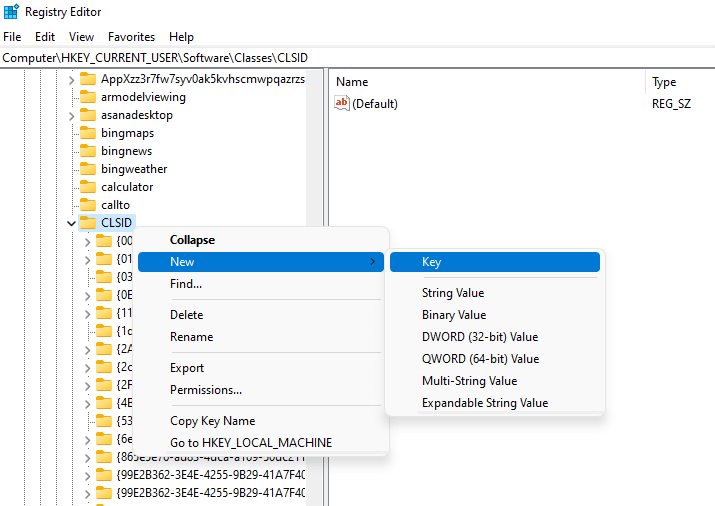
- Right-click on CLSID, select New > Key, and name it:
{86ca1aa0-34aa-4e8b-a509-50c905bae2a2}
- Right-click on the new key you just created, select New > Key, and name it:
InprocServer32
- Double-click the key named (Default) under InprocServer32, remove the value from the Value data field (it won’t have any value by default), and select OK.
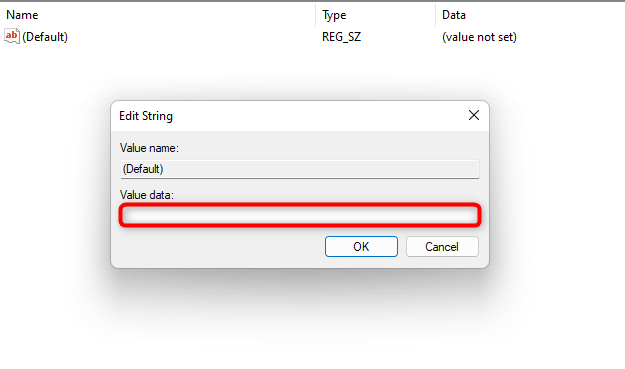
- Reboot.
How to Make Windows 11 File Explorer Look Like Windows 10
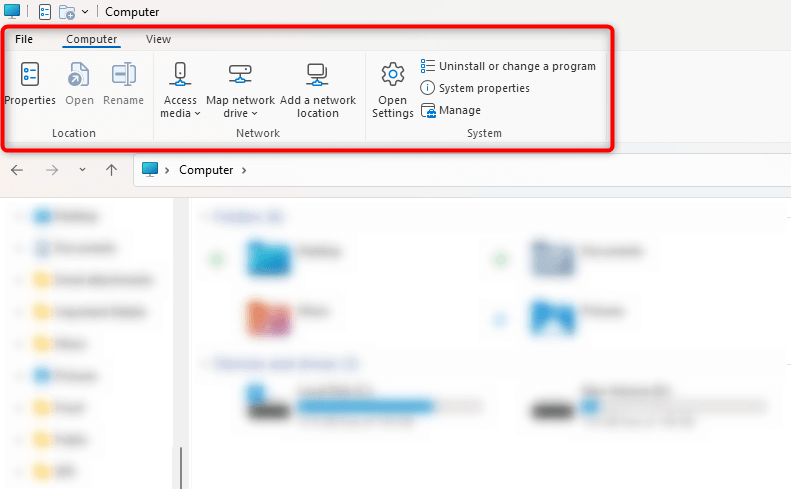
Windows 10 File Explorer had a ribbon at the top, which housed a range of functions like copying, creating, and renaming files and folders. Sure, you can always use the keyboard shortcuts, but some options like System properties don’t have a keyboard shortcut.
Unfortunately, Windows 11 File Explorer lacks that ribbon. However, if you’re habituated to using those functions from the top of the File Explorer, you can get it back using StartAllBack or a registry tweak.
Bring Back the Old File Explorer With a Third-Party Tool
Here is how you can bring back the Windows 10 File Explorer on Windows 11 using StartAllBack:
- Select the Explorer tab from the left.
- Select Win 10 Ribbon UI from the section called Choose Explorer style.
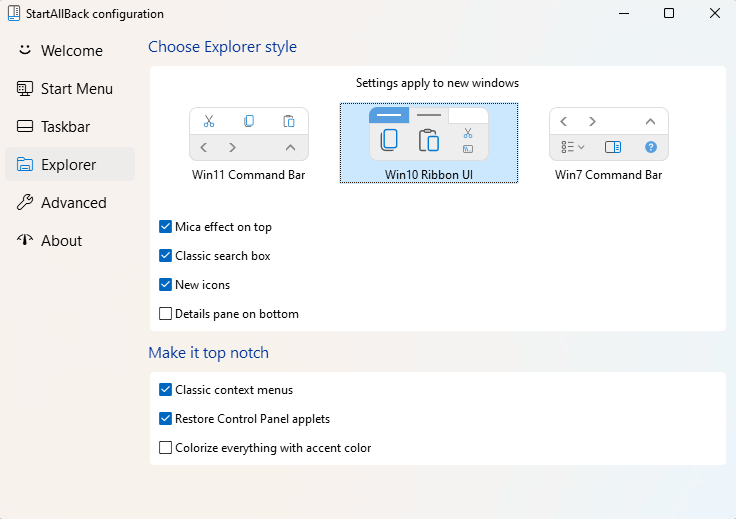
When done, you’ll see the ribbon at the top of the File Explorer:
Switch to the Classic File Explorer With a Registry Tweak
In case you don’t want to install a third-party tool, you can also just tweak the registry:
- Press Win + R, type regedit, and press Enter.
- Copy and paste the following into the Registry Editor’s navigation bar:
HKEY_LOCAL_MACHINE\SOFTWARE\Microsoft\Windows\CurrentVersion\Shell Extensions
- Right-click on the Shell Extensions key, select New > Key, and name it Blocked.
- Select the Blocked key, switch to the right pane, right-click on the white space, and select New > String value.

- Name the value:
{e2bf9676-5f8f-435c-97eb-11607a5bedf7}
- Reboot.
You’ll have enabled the Windows 10 Classic File Explorer when you restart.
How to Make Windows 11 Corner Icon Flyouts Look Like Windows 10
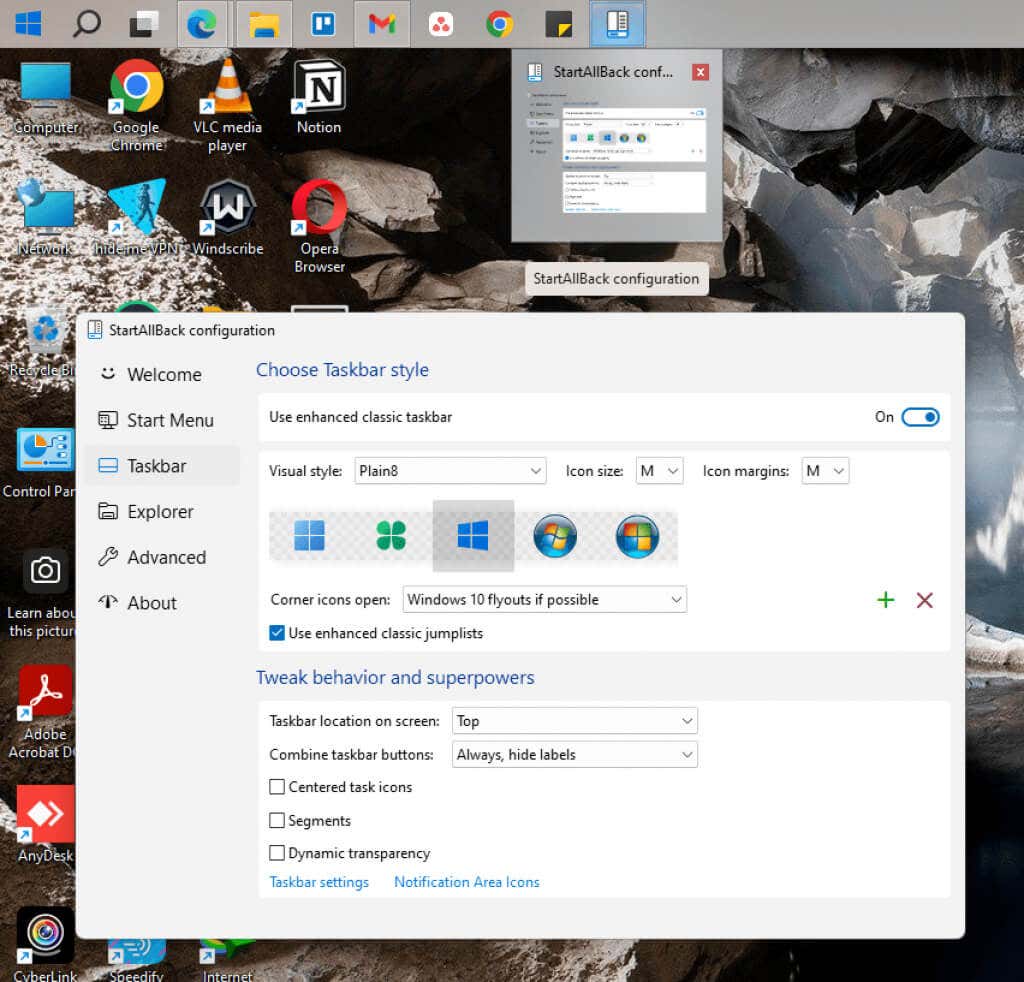
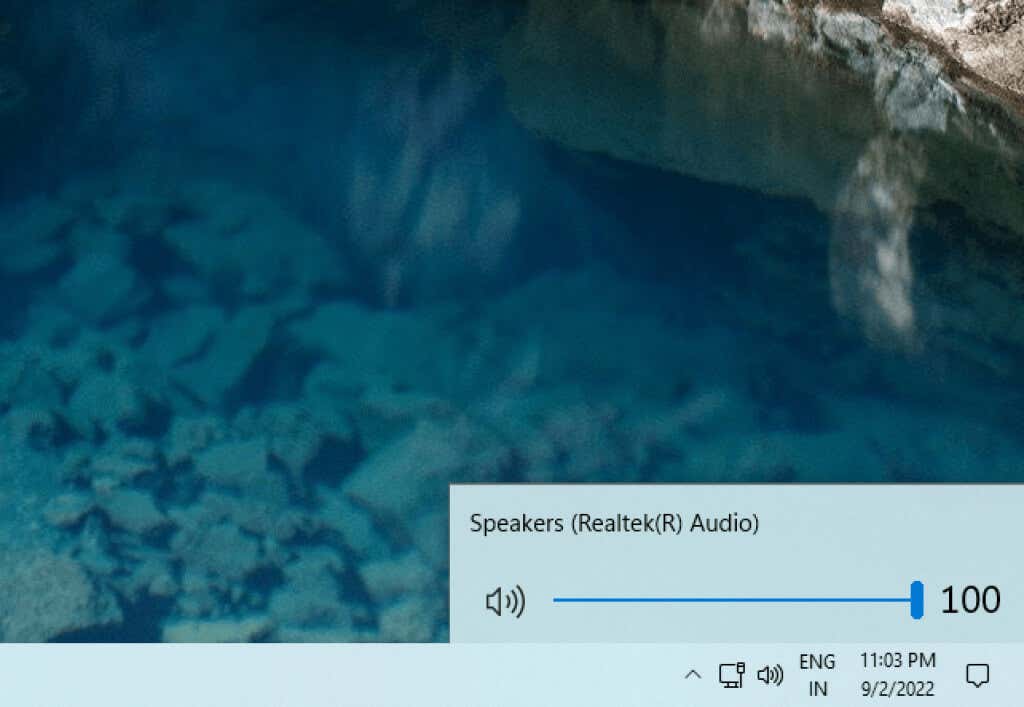
Windows 11 redesigned almost every flyout for the corner icons, including the calendar, volume, and language. You can, however, use Windows 10 flyouts for some of these icons, provided you’re using StartAllBack as your third-party customization tool:
- Select Taskbar from the left sidebar.
- In the right pane, expand the drop-down menu next to Corner icons open.
- Select Windows 10 flyouts if possible.
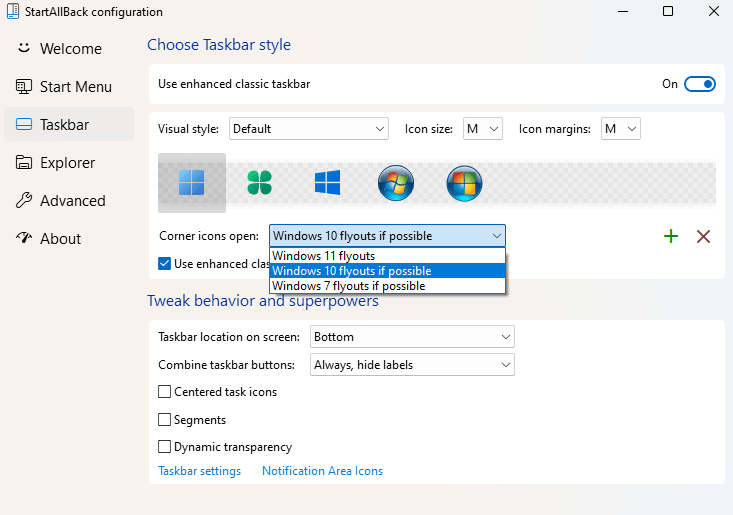
Flyouts for icons like volume and calendar will now be similar to Windows 10.
However, the flyout for the network icon remains unchanged.
A Final Touch: Windows 10 Wallpaper
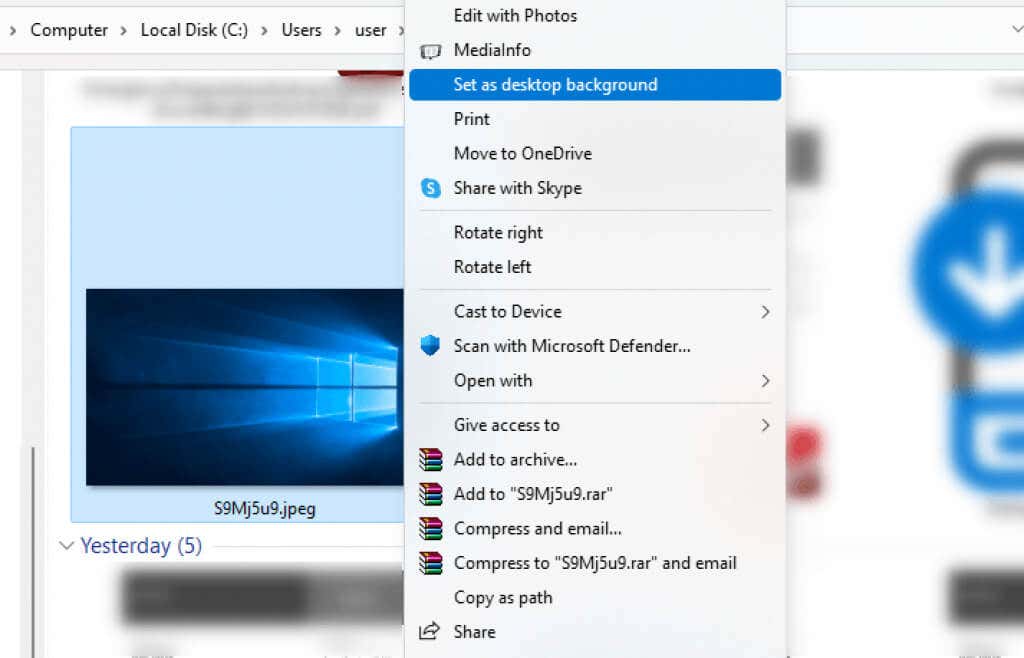
Once you’ve made all these changes, your computer should look and feel like Windows 10 to a good extent. However, changing the wallpaper to the Windows 10 default can be an excellent final touch to bring your visual experience closer to Windows 10.
- Go to an image of the Windows 10 default wallpaper.
- Right-click on the image and select Save image as. Save the file in your preferred location.

- Go to the location where you saved the file.
- Right-click on the image and select Set as desktop background.
Alternatively, you can also change the wallpaper from the Settings app.
Windows 11, Redesigned
Windows 11 comes with some major design changes. While many like the new, curvy interface, other Windows users continue to like the Windows 10 experience. Windows 10 indeed had one of the best interfaces of any version of Windows.
With the methods discussed in this guide, you should be able to use your new Windows 11 PC with all its new features, like Android apps and widgets, but with the Windows 10 Start Menu, taskbar, and File Explorer. Hopefully, you like your Windows 11’s new look.