Help older computers find and use it
Once you have setup a homegroup using Windows 7/8/10 on your network, the next step is to fine-tune it so that all the older computers can find each other. All Windows 7 and higher computers will easily be able to join the homegroup by just using the password, but if your network contains computers running older versions of Windows, you’ll have to put them into the same workgroup.
If computers running Windows XP are part of your network, it’s important to use the same workgroup name for all of the computers on your network. This makes it possible for computers running different versions of Windows to detect and access each other. Remember that the default workgroup name is not the same in all versions of Windows. 99% of the time it is just called WORKGROUP, but in case it’s not, make sure to change it to that.
Configure Workgroup
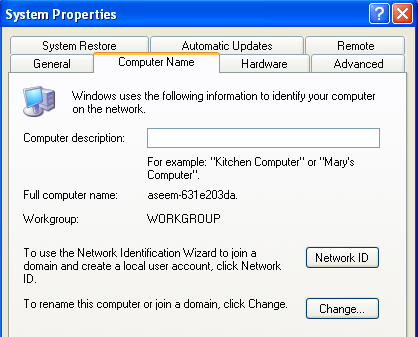
To find or change the workgroup name on a computer running Windows XP click Start, right-click My Computer, and then click Properties.
In System Properties, click the Computer Name tab to see the workgroup name. If it’s not WORKGROUP, click Change, and type the new name under Workgroup.
In Windows 7/8/10, you can verify the workgroup by going to the Control Panel and then clicking on System. At the bottom, you will see the workgroup name.
Basically, the key to adding XP computers to a Windows 7/8/10 homegroup is to make it part of the same workgroup as those computers. However, you will run into issues when trying to access the Windows XP computer from Windows 7/8/10 or vice versa. Don’t worry though, a little bit of troubleshooting will fix it.
Troubleshoot Windows XP Network Issues
The first issue I ran into was when I went to My Computer, clicked on My Network Places and then clicked on View workgroup computers, I got the following error:
Workgroup is not accessible....The service has not been started.
This got me Googling and I tried a whole slew of solutions including turning off the firewall, trying to start the Computer Browser service, enabling NetBIOS, etc. Though those items have to be working properly, they were not exactly causing the problem. First, follow all the directions in this Microsoft support article to make sure the basics are covered.
Once you have done that, try connecting from the Windows XP machine to your Windows 7/8/10 computer by opening Explorer and typing in the network path like below:
In my case, the \\AseemVostro computer is a Windows 10 computer. Oddly enough, even though I get the error when clicking on the View workgroup computers link, I was able to access the shared folders on my Windows 10 machine. My Windows 10 machine logs in using a Microsoft account, so when it asked for the username and password, I entered my email address and password, which worked.
Also, when trying to connect to the XP machine from Windows 10, I kept trying to enter the username and password for my local account on the XP machine, but it simply wouldn’t connect. It finally worked after I did two things. First, I clicked on the Setup a home or small office network link that you see in the screenshot above. I went through the wizard, making sure to name the workgroup WORKGROUP.
Secondly, I connected to the Windows 10 machine first from Windows XP. Once I did that, I was able to connect to my XP machine from Windows 10 without any issue. If you run into any problems, feel free to leave a comment and I’ll try to help. Also, be sure to checkout my complete guide to troubleshooting homegroups in Windows. Enjoy!


